How to create a newsletter using the Advanced AI option
Click Edit / Choose Topics on the newsletter block to begin editing your newsletter.
The Newsletter AI Creator will open.
Go to the Advanced AI tab.
An Advanced AI pop-up will appear with two options:
I am an Individual – Select this if you’re creating a newsletter to represent yourself (e.g., a freelancer).
Newsletter for my Business – Select this if you’re creating a newsletter to represent a company or organization.

AI Creator Tab – Selecting Topics
Aida Jet’s AI Creator tab guides you in selecting relevant topics for your newsletter, whether you are an individual or a business. Follow the steps based on your newsletter type.
Path 1: I am an Individual
Use this if you are a blogger, freelancer, coach, or creating a personal newsletter.
Steps:
Open the AI Creator tab.
Select I am an Individual under Audience Type.
From the dropdown list, choose the profession that best represents you (e.g., Blogger, Freelancer, Coach).
Based on your selection, the AI will suggest topic categories relevant to your field.
Pick the topics you want to include in your newsletter.
✅ This ensures your newsletter is aligned with your personal brand and profession.
Path 2: Newsletter for My Business
Use this if you are creating a newsletter to represent a company, brand, or organization.
Steps:
Open the AI Creator tab.
Select Newsletter for My Business under Audience Type.
From the dropdown list, choose the industry or business type that best represents your organization (e.g., Retail, Education, Technology, Services).
The AI will suggest topic categories tailored to your industry.
After selecting your industry, the screen will automatically move to the One Final Step section, where you can finalize topics and proceed to content selection.
 |

✅ This ensures your newsletter content is targeted, professional, and relevant to your business audience.
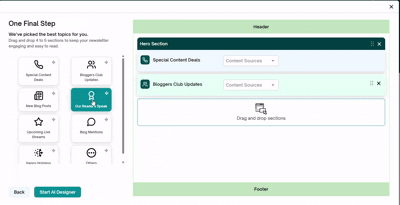
Select the Content:
The Select Content section allows you to build your newsletter by arranging different content blocks and choosing where the content comes from.
Steps to Select Content:
Drag and Drop Sections
From the available options, drag and drop sections into your newsletter layout.
You can rearrange sections anytime to match your preferred order.
Hero Section
The first section in every newsletter is the Hero Section.
This section highlights your main message or announcement and is visually designed to capture immediate attention.
Content Source for Each Section
Every section you add is linked to a Content Source, which defines where the content will be pulled from.
Available Content Sources:
Public URL
Enter a URL from which Aida Jet will extract content for your newsletter.
Example: your company blog, website, or any relevant article/page.Ask AI
Receive AI-generated content suggestions. You can also type a short prompt in the text box to guide the AI in creating specific content for your section.Upload Document
Upload a PDF file containing content that Aida Jet will reference while creating your newsletter.Click Choose File to select and upload a document.
Once uploaded, the file name will appear for confirmation.
 |  |
Manage Sections
Each section you add has a Remove option.
Use this if you want to delete a section you no longer need before moving forward.
Proceed to AI Designer
After selecting your content sources and arranging sections, click Start AI Designer.
Aida Jet will automatically generate a draft newsletter by organizing the selected topics into different sections.
The newsletter editor will then open, allowing you to review, edit, and make any necessary adjustments before finalizing your newsletter.
Next --- > Newsletter Editor
Was this article helpful?
That’s Great!
Thank you for your feedback
Sorry! We couldn't be helpful
Thank you for your feedback
Feedback sent
We appreciate your effort and will try to fix the article